
So uhm-I was thinking today about what I could do as a photography report and it came to me that maybe you guys are interested in how I make my photos look the way I do...rarely do my finished versions look the same as the originals :D Some of you will call this cheating, I just call it improving :P Yeeeah we are talking photoshop. Well technically not photoshop-don't have the money for that-but there is a great freeware version Paint.NET which is very similar and it does most jobs you will need-and there are lots of plugins you can download too! :D
The basics of photoshop are definetely cropping and changing the colors which is why we will start of with those today :)
The basics of photoshop are definetely cropping and changing the colors which is why we will start of with those today :)
Cropping is very very simple. All you do is choose the selection tool from the tools menu,
 click and drag the cursor over the part of the photo you want and press the crop button in the menu at the top!

My tipp for all you people unfamiliar with photoshop-cropping is essential! There is basically no photograph I keep without cropping it, because it can really improve the focus and add a lot of tension to you photographs.
What you have to remember though-all of these irregular shapes are very handy when they are digital but when you print picture there are often set formats you have to keep-so keep what you want to do with the pictures after you have cropped them!
What you have to remember though-all of these irregular shapes are very handy when they are digital but when you print picture there are often set formats you have to keep-so keep what you want to do with the pictures after you have cropped them!
Changing the Colors is a little more tricky. There are several different ways of changing the colors of a photograph and you basically have to experiment which you like best. The way I do it, is change everything, try everything and experiment with everything. Yes this is time consuming but it is fun too! :D
The first method is using the color and saturation tool which you can find under the tab "corrections".
The first method is using the color and saturation tool which you can find under the tab "corrections".

It is fairly straightforward-the first bar is for what color tone you have-you could make everything red or blue or pink if you like. Second bar is changing the saturation of the colors. If you put it way to the left it will become black and white, on the other side is very colorful :D
The second method is using the curve tool which is under the same menu.
The second method is using the curve tool which is under the same menu.
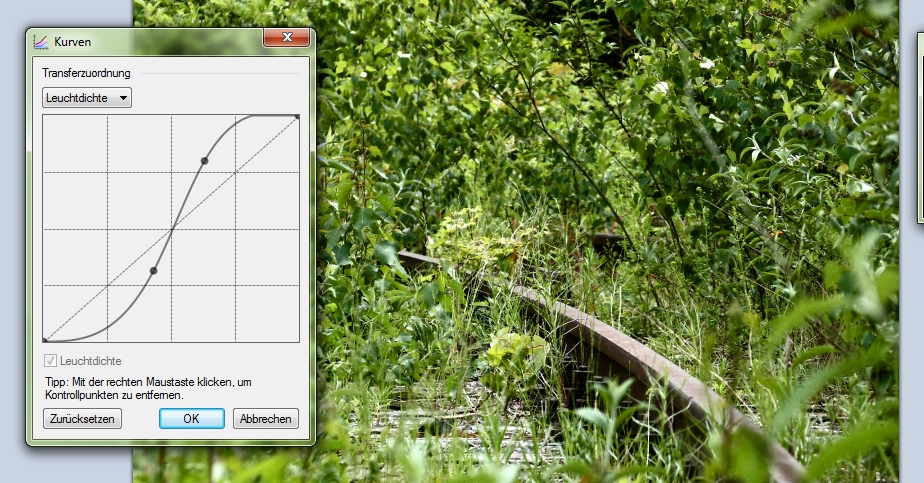 The cool thing about this tool is that you can either set it to light density and change the contrast (the most common shape for the curve here is the S shape you can see here)
ooor you can set it to RGB and then change the colors individually :D
The last and trickiest method to change your colors is using the manual modification menu which you can aso find under the tab "corrections".
There you basically change the histrogramm of the photo. I can't tell you exactly what this is our how it works I just know that you can do awesome stuff when changing :D Here you can also adjust every color individually which is awesome to ;)
There you basically change the histrogramm of the photo. I can't tell you exactly what this is our how it works I just know that you can do awesome stuff when changing :D Here you can also adjust every color individually which is awesome to ;)

One thing to remember when adjusting photos though-never forget to keep a copy of the original! If you ruin it and accidently press save you will go maad if you don't still have the original...trust me :D it has happened XD
xoxo Alex
No comments:
Post a Comment